WebTop groupware
WebTop is a full-featured groupware which implements ActiveSync, CalDAV and CardDAV protocols.
You can install multiple WebTop instances on the same node from the Software center.
Configuration
WebTop needs a dedicated virtual host, an FQDN like webtop.nethserver.org.
Before proceeding with the configuration, make sure to create the corresponding name record inside your DNS server. If you are planning to use a Let's Encrypt certificate as default, make also sure to have a corresponding public DNS record.
How to configure:
- access the application configuration page and enter a valid FQDN inside
WebTop virtual hostfield - enable
Request Let's Encrypt certificate - bind the WebTop instance to an existing
Mail server - select the
Default localeand theDefault timezone - click the Save button
Inside the Advanced section, you can also configure:
- the debug mode
- log levels
- minimum and maximum memory
- PEC Bridge notify address (Nethesis Enterprise Only)
Admin user
After installation, WebTop will be accessible using the administrator user. The administrator user can change global settings and login as any other user, however, it's not a system user and can't access any other service like Mail, Calendar, etc.
Default credentials are:
- User: admin
- Password: admin
The administrator user's password must be changed from within the WebTop interface.
Remember to change the admin password after installation!
To check the mail of the system's user admin account use the following login: admin@<domain> where <domain> is the domain part of server FQDN.
Example
- Server name: mymail.mightydomain.com
- User: admin
- Login: admin@mightydomain.com
Change admin password
Access WebTop using the admin user, then open user settings by clicking on the ![]() menu in the top-right corner.
menu in the top-right corner.
Go to Settings then click on Change password.
Changing the logo
To modify and customize the initial logo that appears on the login page of WebTop, you must upload the custom image file on the public images of the admin user and rename it login.png.
Proceed as follows:
-
login with the WebTop user admin
-
select the cloud service and public images:
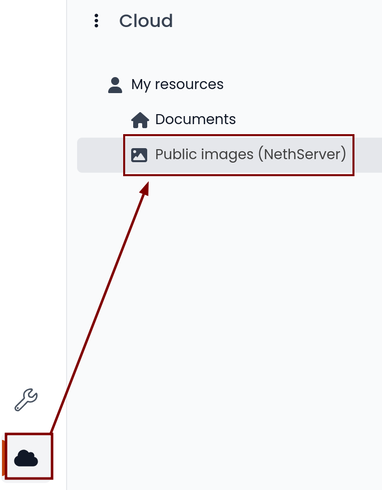
-
upload the image (via the Upload button at the bottom left or simply dragging with a drag & drop)
-
rename the loaded image so that its name is "login.svg" (use right click -> Rename):
-
the next login will show the new logo on the login page
Custom logos for light and dark color schemes
It is possible to provide custom logos for both light and dark modes by uploading two different image files to the public cloud.
During the login process, the system looks for a custom login image using the following filename priority order:
login@{color-scheme}.svglogin@{color-scheme}.pnglogin@{color-scheme}.jpglogin.svglogin.jpglogin.png
Where {color-scheme} can be either light or dark.
Examples:
login@dark.svg
login@light.svg
If a color-scheme–specific image is not found, the system falls back to the generic login.* filenames.
Automatic configuration of email clients
The Autodiscover and Autoconfig protocols allow email clients to automatically discover mail server settings, such as incoming and outgoing mail server addresses, ports, and authentication methods. This simplifies the configuration process for end users, as they do not need to manually enter server settings.
The Autodiscover and Autoconfig protocols are not supported by all email clients. For example, iOS devices do not support them, while clients like Thunderbird and Microsoft Outlook on Windows and Linux desktops, as well as Android devices, do support them. Some clients may still require manual configuration of server settings.
To enable automatic email client configuration, some DNS records and HTTP routes must be configured for the WebTop mail domain (e.g. example.org).
A records
The A-type records are used by email clients to establish TLS connections, therefore their names must be associated with a valid TLS certificate.
mail.example.org,imap.example.org,smtp.example.orgmust point to the public static IP of the mail serverautodiscover.example.org,autoconfig.example.orgmust point to the public static IP of the server hosting WebTop.
HTTP routes
To ensure that Autodiscover and Autoconfig requests are directed to the correct WebTop instance, you need to set up an HTTP route to the WebTop server. Navigate to Settings → HTTP routes from the proxy page. This configuration is necessary for A-type DNS records like autodiscover.example.org and autoconfig.example.org to be properly managed by the WebTop application.
Configure the HTTP route with the following parameters for both Autodiscover and Autoconfig:
- Name:
autodiscover_webtopandautoconfig_webtop - Node: Select the node where your WebTop instance is running
- URL: Copy the URL, including its specific port number, from the automatically generated WebTop HTTP route details (e.g. http://127.0.0.1:20001)
- Host:
autodiscover.example.organdautoconfig.example.org - Request Let's Encrypt certificate: Enable this option if you wish to use a Let's Encrypt certificate (optional)
MX record
An MX-type record is also a Mail application requirement, as explained in General settings. For the MX record of example.org Autodiscover prefers a name like mail.example.org.
SRV record
This enables clients to locate the Autodiscover service using a SRV-type record.
- Name:
_autodiscover._tcp.example.org - Type:
SRV - Service:
_autodiscover - Protocol:
_tcp - TTL:
3600 - Priority:
10 - Weight:
10 - Port:
443 - Target:
autodiscover.example.org-- the DNS A record pointing to the WebTop server.
Custom labels
It is possible to add one or more labels to an email, a calendar event or a task.
There are two types of labels:
- Private: not usable for custom fields and not visible to other users
- Shared: usable for custom field panels and visible to other users
The user can normally only manage Private labels. In order to manage the Shared labels it is necessary to enable a specific authorization via the admin panel:
- go to the Administration menu, then choose Domains -> NethServer -> Groups -> Users -> Authorization
- add (+) -> Services -> com.sonicle.webtop.core (WebTop) -> Resource -> TAGS -> Action -> MANAGE
- click OK then Save and exit
You can manage the labels from the tools ![]() button icon at the top right corner.
button icon at the top right corner.
The same functionality can also be reached from the individual modules by right-clicking -> Labels -> Manage labels.
Visibility can be set only during label creation. To change the label visibility you need to delete the label and create it again.
The created labels can be used in any other module like Mail, Address Book, Calendar and Tasks.
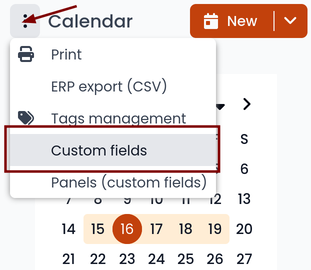
Custom fields
With custom fields, it is possible to provide information and additional data for each contact, event or activity.
Custom fields are only available for the Address Book, Calendar, and Tasks modules and are specific to each different module.
In order to manage custom fields and their panels, the user must have a specific authorization, obtained through the administration panel:
- go to the Administration menu, then choose Domains -> NethServer -> Groups -> Users -> Authorization
- add (+) -> Services -> com.sonicle.webtop.core (WebTop) -> Resource -> CUSTOM_FIELDS -> Action -> MANAGE
- click OK then save and exit
Users who have this authorization will find the specific button available at the top right:
To create a new custom field it is necessary to fill in at least the Name field and select the Type:
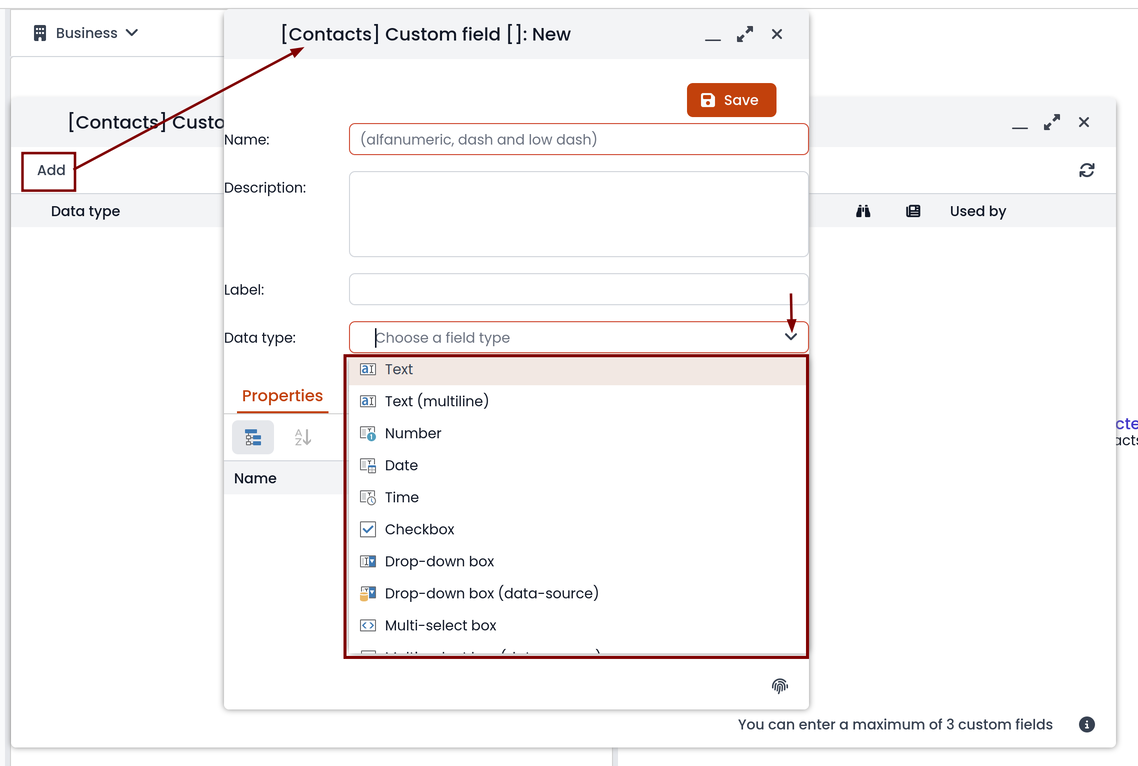
For the Name field only alphanumeric characters (including - and _) are allowed. Spaces are not allowed. The Description field is used to add details to the field and the Label field represents the label that will be shown along with the field.
For each field it is possible to enable two options:
- Show in search bar: the field is added in the multiple search window (a new access will be required)
- Show in preview: the field is shown in the preview window of a contact
Additional specific properties, that are also customizable, are available for each type.
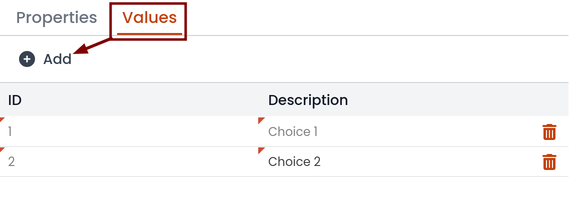
For the List box type it is necessary to fill in the values to be selected:
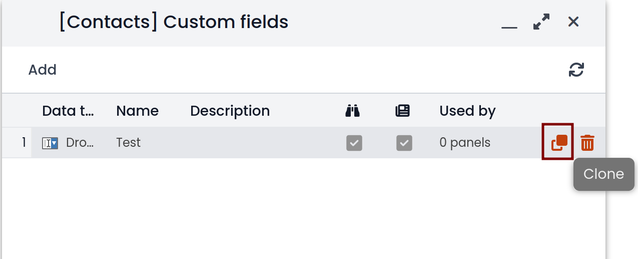
Using the Clone button you can copy the custom field to create similar ones:
With the FREE version, installed by default, it is possible to create up to a maximum of 3 custom fields for each different module (3 in Address Book + 3 in Calendar + 3 in Activities). To remove this limit it is necessary to upgrade to the PREMIUM version by purchasing a dedicated license on Nethesis shop
Searches on custom fields
One of the best functionalities of custom fields is the possibility to perform multiple searches on all modules and fields for which the option Show in search bar has been activated.
Custom panels
Custom panels display the Custom fields and associated them with resources.
Users with the authorization to manage custom fields can access the configuration panel using the button at the top right:

When creating a new panel it is mandatory to indicate the Name that will appear in the resource. You can also insert a Description and a Title.
Using shared labels, you can easily assign panels to specific resource categories. A panel without an associated label will be visible for every available resource: all contacts, all events or all activities.
Use the Add button to add a custom field inside the panel.
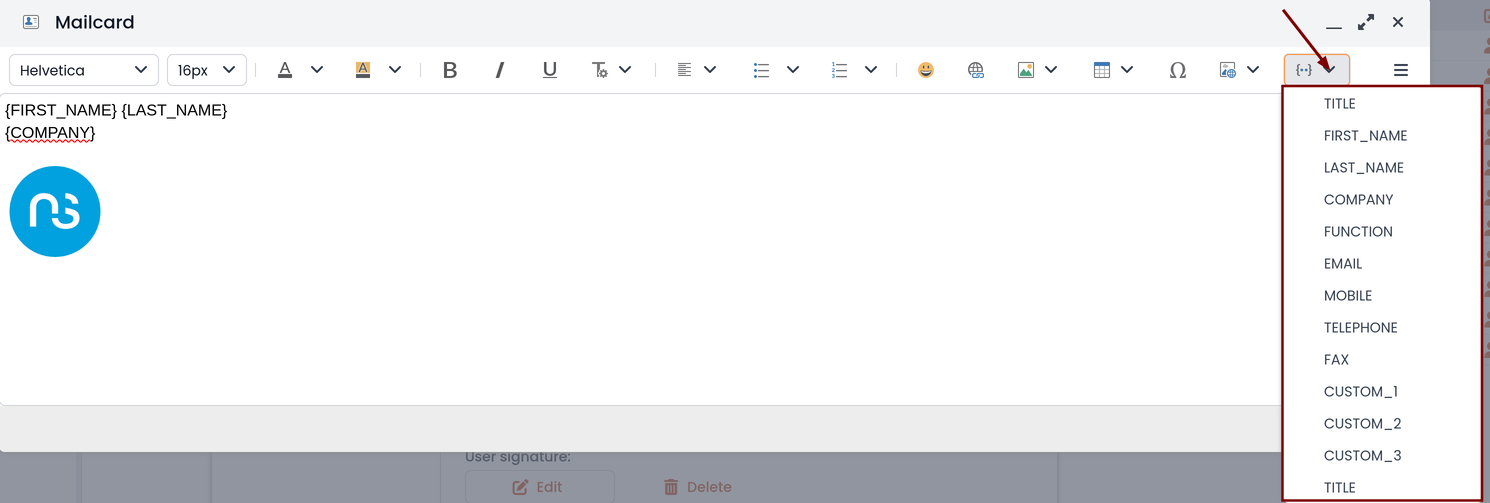
Mailcards
One of the main features of managing signatures on WebTop is the opportunity to integrate images or custom fields profiled per user.
To use the images you need to upload them to the public cloud through the WebTop admin user like this:
You can use the Upload button to load an image which is at the bottom or simply via drag & drop.
Remember that the public images inserted in the signature are actually connected with a public link. To be visible to email recipients, the server must be reachable remotely on port 80 (http) and its FQDN name must be publicly resolvable.
Alternatively, you can configure a global setting to turn images automatically into inline attachments instead of public internet links.
It is possible to do this from web interface by accessing the administration panel -> Properties (system) -> Add -> select com.sonicle.webtop.mail (Mail) and enter the data in the Key and Value fields according to the key to be configured:
public.resource.links.as.inline.attachments = true (default = false)
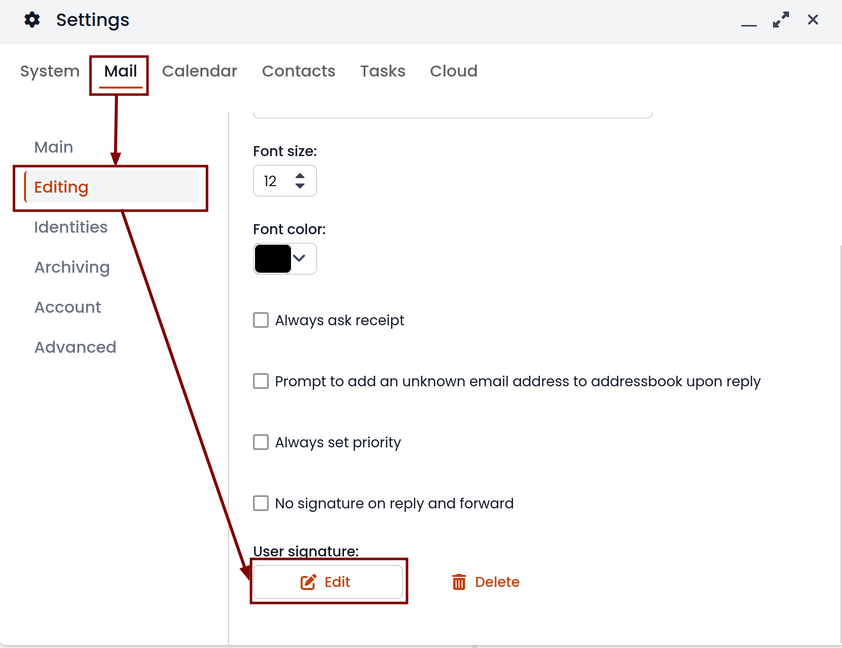
To change the signature, each user can access the Settings --> Mail --> Editing --> Edit:
You can use the uploaded image inside the mailcard with this button:

The personal mailcard can be associated with the user or the mail address. Users with access to the mail address will also be able to use the mailcard.
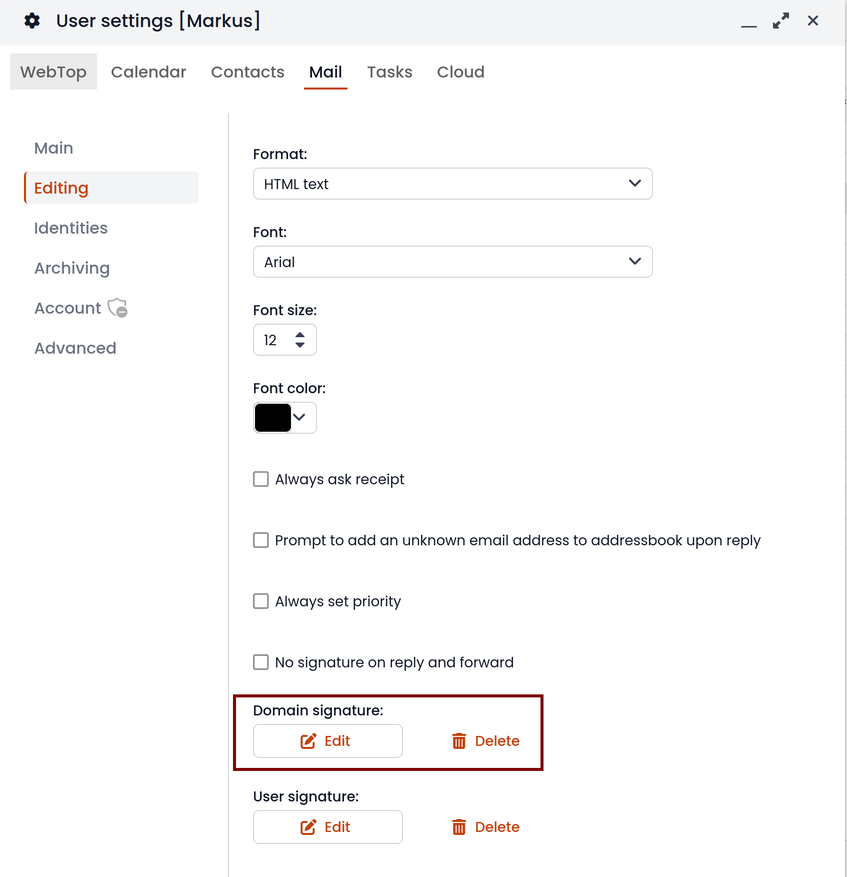
By accessing the user settings from the WebTop administration panel ( Domains --> NethServer --> Users --> Right click on user ) it is also possible to set up a general domain mailcard that will be automatically set for all users who have not configured their personal mailcard:
Furthermore, it will also be possible to modify personal details:
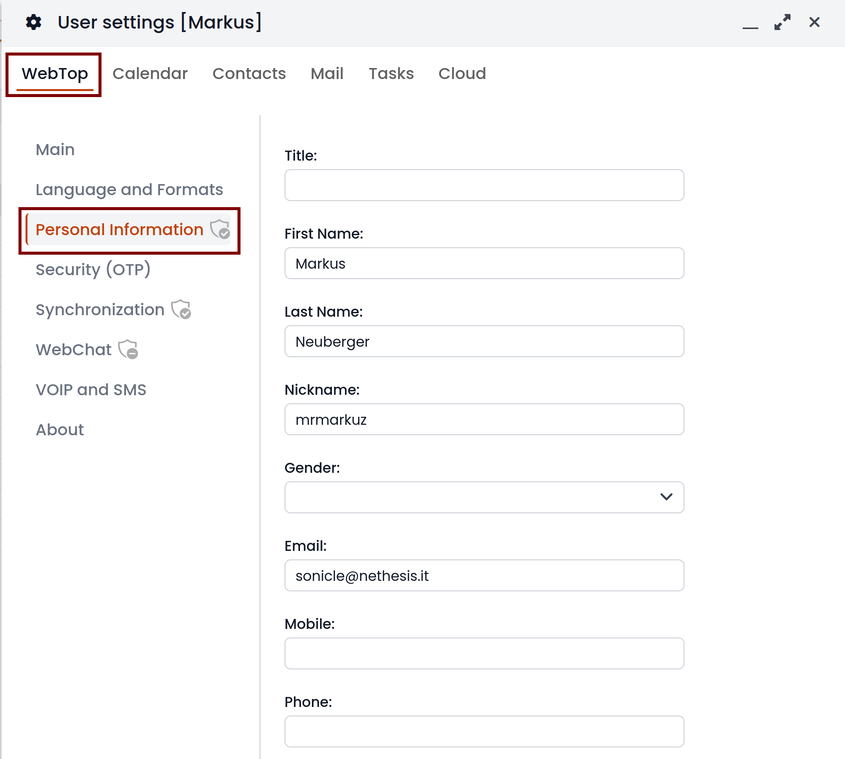
that can be used within the template-based fields within the domain mailcard editor:
In this way it is possible to create a single mailcard that will be automatically customized for every user who does not use his own mailcard.
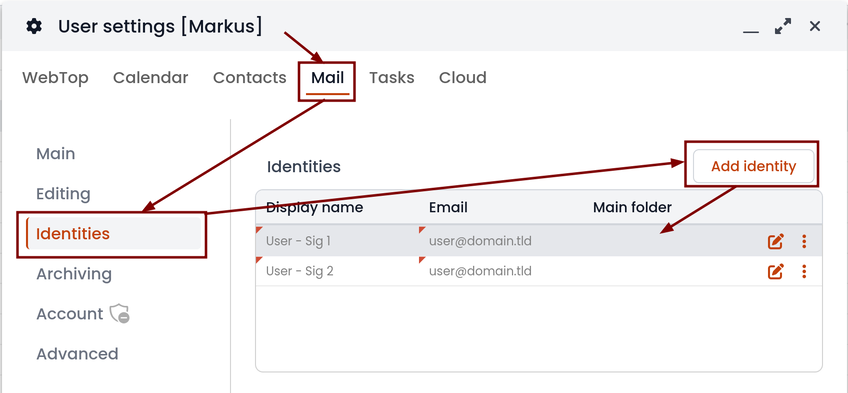
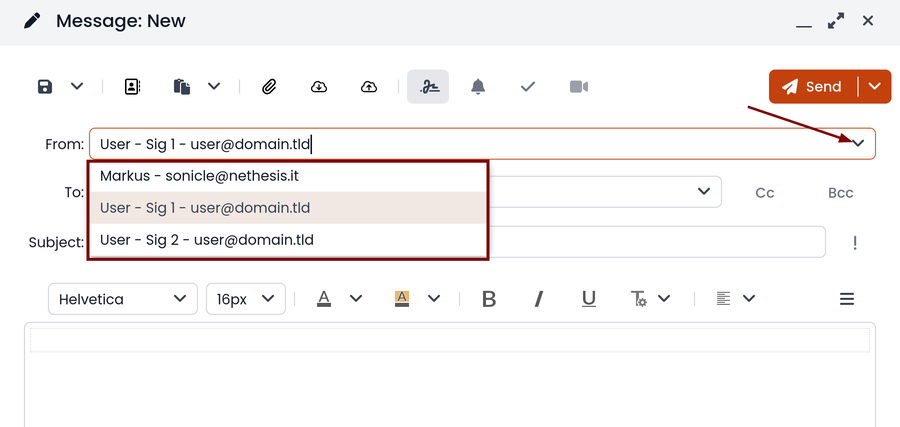
Multiple mailcards
It is possible to configure multiple mailcards (HTML signatures) for each user.
Access the Settings --> Mail --> Identities and create multiple identities:
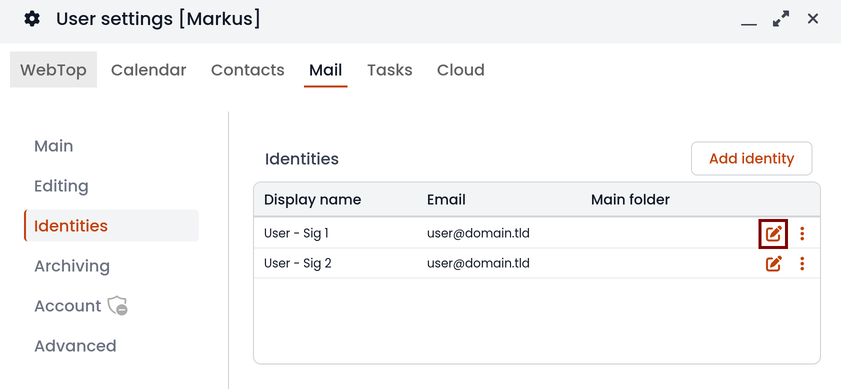
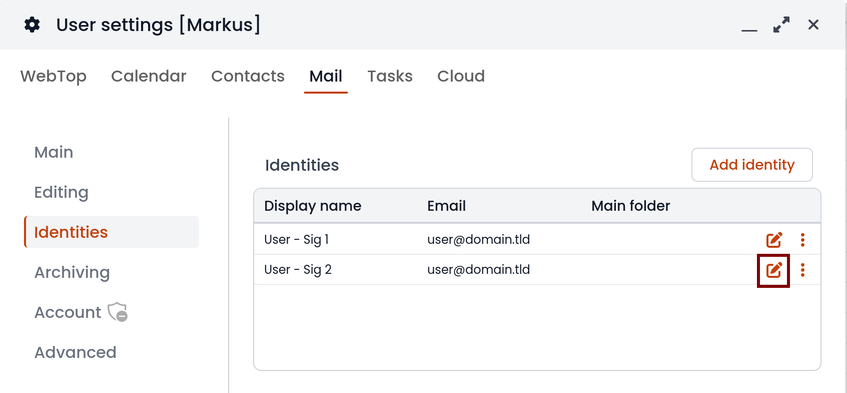
To edit every single signature select Settings --> Mail --> Identities then select each individual signature and click on the edit mailcard button
to use multiple mailcards, create a new email, and choose the signature:
Customize proactive security on emails
The Proactive Security module (PAS) warns the end user of possible security risks and suspicious senders inside the emails. The user will also be warned when trying to open potentially dangerous attachments or links contained in emails.
The PAS function allows some customization both for the end user and the WebTop admin.
For the end user it is possible to mark a sender as trusted when it is recognized as such by the yellow shield. To do so, it is possible to click directly on the shield or right click on the sender and select the Mark as trusted entry.
This type of customization is only valid for the user that performed the action. It is possible to mark a sender as trusted only if the shield is yellow.
The admin user can disable all or some of the rules that are part of the PAS (ProActive Security), both for single users and groups. To do so, it is necessary to add a specific authorization (to the single user or the group of users) for the Service com.sonicle.webtop.mail (Mail) and for the PRO_ACTIVE_SECURITY resource:
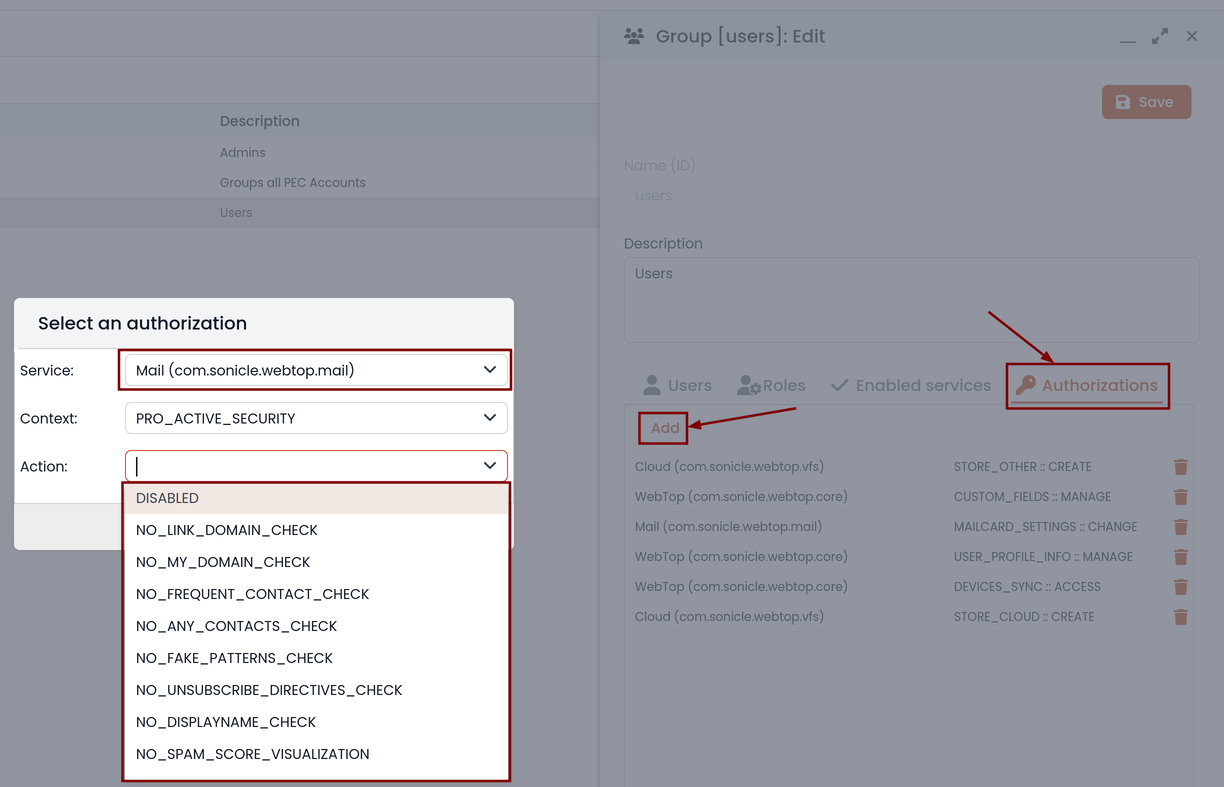
Below is an explanation of every single entry available as Action :
DISABLED: completely disables PASNO_LINK_DOMAIN_CHECK: do not check domains different from the sender’s domainNO_MY_DOMAIN_CHECK: do not verify if the sender’s domain is in my domainNO_FREQUENT_CONTACT_CHECK: do not check if the sender is in my contacts which are saved automaticallyNO_ANY_CONTACTS_CHECK: do not check if the sender is among one of my contactsNO_FAKE_PATTERNS_CHECK: do not verify the presence of false patterns in the sender (e.g. email address of the name shown is different from the sender’s email address)NO_UNSUBSCRIBE_DIRECTIVES_CHECK: do not check the entry for the unsubscribe directives to the mailing list (only if the spam status is green)NO_DISPLAYNAME_CHECK: do not compare the contact’s display name with the contact in my address book with the same emailNO_SPAM_SCORE_VISUALIZATION: do not show/check the spam score displayed in the message headerNO_LINK_CLICK_PROMPT: do not check the click action on linksNO_ZIP_CHECK: do not give warning about zip attachments
This way it is possible to customize and create special profiles for some users who might not want all the actions to be active.
The administrator can also choose the list of file extensions for attachments which are considered a threat. As default, these are the extensions that are considered dangerous: exe,bat,dll,com,cmd,bin,cab,js,jar
To modify this list it is necessary to add this global setting:
- Service =
com.sonicle.webtop.mail - Key =
pas.dangerous.extensions
For example, if you wanted to add the HTML extension among those that are considered dangerous, the value field should contain the following:
- Value =
exe,bat,dll,com,cmd,bin,cab,js,jar,html(Values always need to be separated by a comma)
User access and user session logs
The table showing the entire log of accesses and sessions for each user is available under the administrator panel. Access the Administration menu, then Domains --> NethServer --> Audit (domain) --> Access log.
For each access, the table reports the following data in columns: session ID, user name, date and time, session duration, authentication status and any login errors.
You can enable public IP geolocation. First, you need to register an account on ipstack and obtain the API KEY to insert in the configuration db.
Login to the administration panel -> Properties (system) -> add -> com.sonicle.webtop.core (WebTop) -> enter the following data in the fields Key e Value :
geolocation.provider=ipstackgeolocation.ipstack.apikey=<API KEY FROM PROVIDER>
Then, logout and a login again. To show the IP geolocation please click on the icon at the far right of the row:

Impersonate login
By default, the logins made through impersonate (admin!<user>) are not shown in the access logs table. In order to also add this type of access, you need to add the following key for the core service:
key=audit.logimpersonatedvalue=true
Maximum file size limit
There are pre-configured limits related to the maximum file size:
- Maximum file size for chat uploads (internal default = 10 MB)
- Maximum file size single message attachment (internal default = 10 MB)
- Maximum file size for cloud internal uploads (internal default = 500 MB)
- Maximum file size for cloud public uploads (internal default = 100 MB)
To change these default values for all users, the following keys can be added via the admin interface: Properties (system) -> Add. The value must be expressed in bytes. Example: 10MB = 10485760 bytes.
Maximum file size for chat uploads
- Service:
com.sonicle.webtop.core - Key:
im.upload.maxfilesize
Maximum file size for single message attachment
- Service:
com.sonicle.webtop.mail - Key:
attachment.maxfilesize
Maximum file size for cloud internal uploads
- Service:
com.sonicle.webtop.vfs - Key:
upload.private.maxfilesize
Maximum file size for cloud public uploads
- Service:
com.sonicle.webtop.vfs - Key:
upload.public.maxfilesize
PEC Bridge
Available in Nethesis Enterprise only
PEC (Posta Elettronica Certificata) is widely used in Italy as a virtual substitute for registered mail, as it holds the same legal validity.
PEC Bridge is a WebTop feature that integrates external PEC mailboxes with WebTop.
If your system has an active Subscription under the Nethesis Enterprise plan, you can purchase a PEC Bridge license through the NethService category in the Nethesis online shop.
Once the purchase is completed, Nethesis will provide instructions to activate the license and configure the PEC Bridge.
Inside the Advanced settings of the WebTop administration panel, you can set the PEC Bridge notify address to receive notifications when a new PEC event is received.
Customization
It's possible to customize the PEC Bridge behavior by setting the following environment variables:
-
PECBRIDGE_NOTIFY_OWNER: indicates which notifications to send to the PEC account owner.
Possible values are:all: all notifications sent to the PEC owner (this is the default if the variable is not set)auth: only authentication failure notifications are sent to the PEC ownernone: no notifications are sent to the PEC owner
All notifications will always be sent to the address configured in "PEC Bridge notify address", if configured.
-
PECBRIDGE_FROM_ADDRESS: the email address used as the sender of the PEC Bridge notifications
To configure these variables, access the WebTop server via SSH and execute the following commands:
runagent -m webtop1
echo PECBRIDGE_FROM_ADDRESS=no-reply@test.org >> environment
echo PECBRIDGE_NOTIFY_OWNER=auth >> environment
systemctl --user restart pecbridge
Replace webtop1 with the actual WebTop instance name.
Please note that the command above appends the variables to the environment file, use it only when customizing the environment variables for the first time. On next changes, edit the file directly using a text editor like nano or vi.
NethVoice phonebook integration
Inside the WebTop application there is an automated workflow that allows to:
- export WebTop contacts to the NethVoice centralized phonebook
- import the NethVoice centralized phonebook to the WebTop contacts
The workflow is disabled by default, to enable it:
- make sure at least one NethVoice instance is installed inside the cluster
- in the
Settingspage, select the NethVoice instance from theSynchronize Phonebook with NethVoice instancefield inside theAdvancedsection - save the settings
The synchronization occurs every night, ensuring that the NethVoice centralized phonebook is regularly updated in WebTop. This automated process helps maintain consistency and accuracy between the two systems, allowing users to access the most current contact information without manual intervention.
From WebTop to NethVoice
To add contacts from any WebTop 5 user address book to the NethVoice centralized phonebook, simply share it with the system admin user named Admin (NethServer).
Users can voluntarily choose to share their contacts for import into the NethVoice phonebook. This operation must be performed individually by each user who wishes to share their contacts.
The user must follow these steps:
- open the
Contactssection - under the
My Categoriessection, choose an address book to share, then click on the kebab menu (three dots) and select theSharing and Permissionsmenu item - a drawer will open on the right side of the screen, click the Add button
- in the search field, type
adminand select the user from the list
The address book must be shared directly with the admin user. Sharing it with a group containing the admin user is not sufficient.
Ensure that only individual address books are shared and not the entire category, to prevent synchronization errors.
From NethVoice to WebTop
When the synchronization is active, the NethVoice centralized phonebook is imported into WebTop 5 every night.
Contacts are imported into a newly created address book named Rubrica Centralizzata, within the administrator user account, named Builtin Administrator user. The username corresponds to the one used to provision the user domain associated with the mail server connected to WebTop 5.
To allow other groupware users to access the address book, access with the administrator user and share it with the desired users or groups as READ-ONLY. To share it with all users, select the Users group.
It's possibile to override both the address book name and the user name by setting the following environment variables inside the phonebook.env file:
PHONEBOOK_WEBTOP_ADMINPHONEBOOK_WEBTOP_FOLDER
To do so, access the shell and enter the WebTop instance environment, replace webtop1 with the actual WebTop instance name:
runagent -m webtop1
echo "PHONEBOOK_WEBTOP_ADMIN=myuser" >> phonebook.env
echo "PHONEBOOK_WEBTOP_FOLDER=MyPhonebook" >> phonebook.env
On next synchronization, the address book will be created with the specified name and shared with the specified user.
Please note that the command above appends the variables to the phonebook.env file, use it only when customizing the environment variables for the first time. On next changes, edit the file directly using a text editor like nano or vi.
Manual synchronization
To manually force synchronization and verify correct configuration, run the following command from the shell:
runagent -m webtop1 systemctl --user start phonebook
Replace webtop1 with the actual WebTop instance name.